
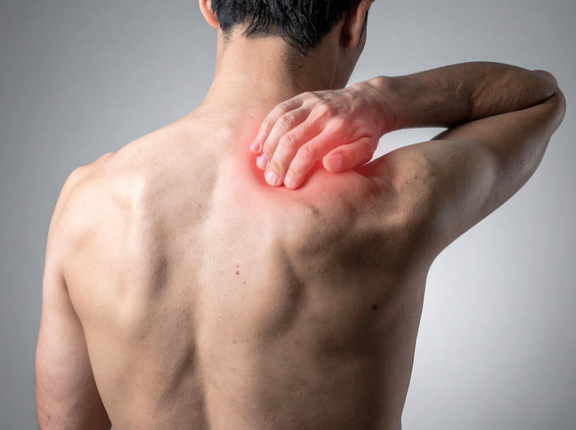
Scapular winging is when your shoulder blade sticks out instead of sitting flat, often causing pain, weakness, and poor movement. The good news? With the right scapular winging physiotherapy, you can restore strength and control. In this blog, we’ll break down causes, symptoms, and exactly how physio can fix it.
Why Your Shoulder Blade Might Be the Real Problem
If you’ve been dealing with shoulder pain that just won’t go away, here’s something most people don’t realise…
👉 It might not actually be your shoulder joint causing the issue.
The scapula (shoulder blade) plays a massive role in how your shoulder moves. When it’s not stable or controlled properly, everything else starts to compensate—and that’s when pain, weakness, and dysfunction creep in.
Scapular winging is one of the clearest signs something isn’t working properly.
What Is Scapular Winging?
Scapular winging happens when the shoulder blade lifts away from the ribcage instead of sitting flat against it.
This creates a noticeable “winging” appearance, especially when you:
- Push against a wall
- Lift your arm overhead
- Carry heavy objects
But beyond how it looks, the real issue is what it does to your movement.
When the scapula isn’t stable, your shoulder loses its foundation—leading to:
- Reduced strength
- Poor control
- Increased injury risk
What Causes Scapular Winging?
Understanding the cause is key to getting the right treatment. Here are the most common reasons we see in clinic:
1. Serratus Anterior Weakness
This is by far the most common cause.
The serratus anterior is the muscle responsible for holding your shoulder blade flat against your ribcage. When it’s weak or not activating properly, the scapula starts to wing.
2. Long Thoracic Nerve Dysfunction
The long thoracic nerve controls the serratus anterior.
If this nerve is irritated or damaged, the muscle won’t function properly—leading to more pronounced winging.
This can happen due to:
- Trauma
- Repetitive overhead activity
- Viral illness
- Post-surgical complications
3. Poor Posture
Long hours sitting at a desk or on your phone can lead to:
- Rounded shoulders
- Tight chest muscles
- Weak upper back muscles
Over time, this creates the perfect environment for scapular winging to develop.
4. Previous Shoulder Injuries
Past injuries like:
- Rotator cuff issues
- Shoulder instability
- AC joint injuries
…can disrupt normal shoulder mechanics and lead to poor scapular control.

Symptoms of Scapular Winging
Not everyone notices the winging straight away. Most people come in with symptoms like:
- A dull ache around the shoulder blade
- Pain when lifting overhead
- Weakness when pushing or pulling
- Early fatigue in the upper back
- Clicking or grinding sensations
- Difficulty with gym exercises
A simple test you can try:
👉 Do a wall push-up. If your shoulder blade sticks out noticeably, that’s a strong sign of scapular winging.
Why You Shouldn’t Ignore It
Scapular winging isn’t just a minor issue—it can lead to bigger problems if left untreated.
When your shoulder blade isn’t stable, it affects:
- Rotator cuff function
- Shoulder alignment
- Force production
This increases your risk of:
- Shoulder impingement
- Tendinopathy
- Chronic pain
- Ongoing weakness
Fixing the scapula is often the missing piece in resolving stubborn shoulder pain.
To learn more about shoulder impingement CLICK HERE to read our blog on this.

How Scapular Winging Physiotherapy Fixes the Problem
This is where scapular winging physiotherapy really shines.
The goal isn’t just to strengthen your shoulder—it’s to retrain how your entire shoulder complex works.
1. Activate the Right Muscles
The first step is getting the key stabilisers firing again.
We focus heavily on:
- Serratus anterior
- Lower trapezius
- Middle trapezius
Common exercises include:
- Wall slides with resistance bands
- Push-up plus
- Serratus punches
- Prone Y and T raises
2. Retrain Movement Patterns
Strength alone isn’t enough—you need control.
We work on:
- Timing of muscle activation
- Smooth scapular movement
- Coordination between shoulder and scapula
This is what creates lasting change.
3. Improve Posture and Mobility
We address contributing factors like:
- Tight chest muscles
- Stiff thoracic spine
- Poor desk setup
These small changes can dramatically reduce strain on your shoulder.
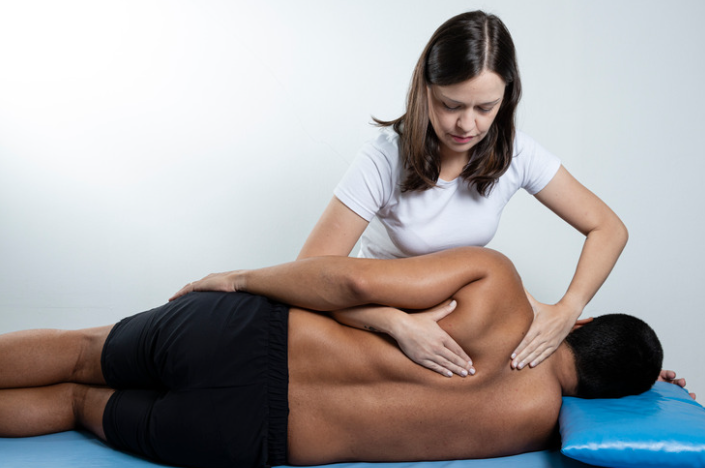
4. Hands-On Treatment
Depending on your presentation, we may also use:
- Joint mobilisation
- Soft tissue release
- Dry needling
This helps reduce pain and improve movement more quickly.
5. Gradual Strength Progression
Once control improves, we build strength back into:
- Gym movements
- Overhead activities
- Sport-specific tasks
The goal is to get you back to full function—not just pain-free, but stronger than before.

Real Patient Example (From Our Clinic)
We recently saw a patient in his early 30s who travelled from Belrose to our clinic in Frenchs Forest NSW with ongoing shoulder pain.
He’d been dealing with discomfort for over 6 months, especially during gym workouts—particularly push-ups and overhead pressing.
Previous treatment had focused purely on the rotator cuff, but nothing was improving.
On assessment, it was clear:
👉 Significant scapular winging due to poor serratus anterior activation.
What We Did:
- Targeted serratus anterior strengthening
- Scapular control retraining
- Postural corrections
- Gradual return-to-gym programming
The Outcome:
Within 6 weeks:
- Pain significantly reduced
- Strength improved
- Returned to gym training pain-free
By 10–12 weeks:
- Full return to all activities
- No visible winging during movement
This is a perfect example of how addressing the real cause makes all the difference.
How Long Does Recovery Take?
Recovery depends on the severity and cause:
- Mild cases: 4–8 weeks
- Moderate cases: 8–16 weeks
- Nerve-related cases: several months+
The key?
👉 Consistency with the right exercises.
When Should You See a Physio?
You should get assessed if you have:
- Ongoing shoulder blade pain
- Weakness or instability
- Difficulty lifting your arm
- Visible winging
The earlier you start, the faster you recover.
Final Thoughts
Scapular winging is often the hidden reason behind stubborn shoulder pain and weakness. The good news is that with the right scapular winging physiotherapy, you can restore proper movement, build strength, and get back to doing what you love—without pain holding you back.
FAQs
What is scapular winging?
Scapular winging is when the shoulder blade lifts away from the ribcage instead of sitting flat, often due to muscle weakness or nerve issues.
Can scapular winging be fixed with physiotherapy?
Yes, most cases improve significantly with targeted physiotherapy focusing on strength, control, and movement retraining.
How long does scapular winging take to heal?
Recovery can take anywhere from 4 weeks to several months depending on severity and underlying cause.
Is scapular winging serious?
It can lead to ongoing shoulder pain and dysfunction if left untreated, but is usually very manageable with the right treatment.
What exercises help scapular winging?
Exercises that target the serratus anterior and lower trapezius—like wall slides and push-up plus—are highly effective.
References
- https://www.physio-pedia.com/Scapular_Winging
- https://www.ncbi.nlm.nih.gov/books/NBK541005/
- https://www.jospt.org/
- https://www.shoulderdoc.co.uk/
- https://www.healthline.com/health/scapular-winging
If you’re dealing with shoulder pain, weakness, or think you might have scapular winging, don’t leave it to chance.
Give us a call today on 9806 3077, or book online, just CLICK HERE: https://x-physio.au4.cliniko.com/bookings#service
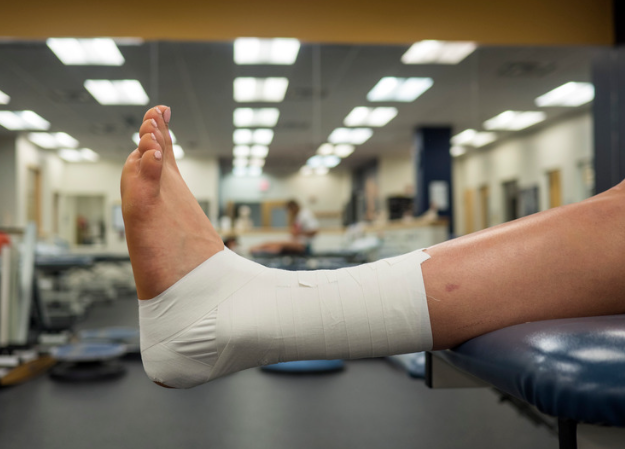
A high ankle sprain often takes longer to recover than a typical ankle sprain because it involves the ligaments that stabilise the lower leg bones rather than just the ankle joint itself. If you’re struggling with high ankle sprain recovery, the right physiotherapy treatment can speed things up, prevent long-term problems, and get you back to sport or work sooner.
What Is a High Ankle Sprain?
Most people think all ankle sprains are the same. In reality, there are different types.
A high ankle sprain occurs when the ligaments connecting the tibia and fibula (the two bones of the lower leg) are injured. These ligaments are called the syndesmosis and they help stabilise the ankle when you twist, run, or change direction.
This is different from a standard ankle sprain, which usually affects the ligaments on the outside of the ankle.
High ankle sprains commonly occur during:
- Football or rugby tackles
- Sudden twisting while the foot is planted
- Skiing or snowboarding falls
- Running or pivoting sports
- Slipping or awkward landings
Because these ligaments stabilise the entire lower leg, injuries here often take significantly longer to heal.
Why High Ankle Sprain Recovery Takes Longer
A lot of patients ask us the same question:
“Why is my ankle sprain taking so long to heal?”
The answer usually comes down to the type of ligament involved.
1. The Ligaments Are Under Constant Stress
The syndesmosis ligaments hold the tibia and fibula together.
Every time you:
- Walk
- Run
- Jump
- Twist your foot
Those bones naturally separate slightly.
When the ligaments are injured, every step stresses the injury, which slows healing.
2. Poor Blood Supply
Ligaments naturally have less blood supply than muscles, which means slower healing.
The syndesmosis area has even less circulation, which can extend recovery time.
3. The Injury Is Often More Severe
High ankle sprains are commonly seen in contact sports and high-impact injuries.
This often means:
- Greater ligament damage
- More swelling
- More joint instability
In some cases, the injury may even involve a small fracture or severe ligament tear.
4. The Joint Needs Time to Regain Stability
Even after pain settles, the ankle may still feel:
- Weak
- Unstable
- Stiff
- Painful during twisting movements
Without proper rehabilitation, people often return to activity too soon, leading to reinjury.
This is why structured physiotherapy is essential for high ankle sprain recovery.
Symptoms of a High Ankle Sprain
A high ankle sprain can sometimes be mistaken for a regular ankle sprain.
However, there are a few signs that make it different.
Common symptoms include:
- Pain above the ankle joint
- Pain when twisting the foot outward
- Difficulty pushing off when walking
- Swelling in the front of the ankle
- Tenderness between the tibia and fibula
- Pain when walking uphill or running
Many patients also report that walking feels unstable or weak.
If these symptoms persist for more than a few days, it’s worth getting assessed by a physiotherapist.
How Long Does High Ankle Sprain Recovery Take?
Recovery depends on the severity of the ligament injury.
Typical recovery timelines are:
| Injury Severity | Recovery Time |
|---|---|
| Mild syndesmosis sprain | 4–6 weeks |
| Moderate sprain | 6–10 weeks |
| Severe sprain | 10–16+ weeks |
Athletes may require even longer rehabilitation before returning to sport.
Without proper treatment, symptoms can linger for months or even years.
Why Early Physiotherapy Is Important
Many people wait weeks before getting treatment.
Unfortunately, this can slow recovery.
Early physiotherapy helps to:
- Reduce swelling and pain
- Restore ankle movement
- Improve joint stability
- Prevent chronic ankle instability
- Speed up return to sport or work
Early treatment also helps identify whether further scans or specialist care are required.
How Physiotherapy Helps High Ankle Sprain Recovery
Physiotherapy focuses on restoring strength, mobility and stability to the ankle.
Treatment usually progresses through several phases.
Phase 1: Pain and Swelling Reduction
Early treatment focuses on calming the injury.
This may include:
- Manual therapy
- Gentle mobility exercises
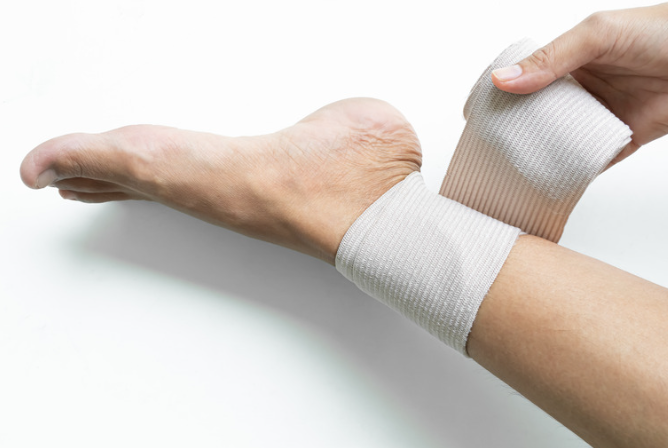
- Taping or bracing
- Load management advice
Reducing inflammation early helps create the right environment for healing.
Phase 2: Restoring Mobility
Once pain improves, treatment focuses on restoring ankle movement.
Stiffness often develops in the:
- ankle joint
- calf muscles
- surrounding ligaments
Your physio may guide you through:
- ankle mobility drills
- stretching exercises
- joint mobilisation techniques
This helps restore normal movement patterns.
Phase 3: Strength and Stability Training
This stage is essential for preventing reinjury.
Exercises typically include:
- calf strengthening
- balance training
- resistance band exercises
- foot stability drills
These exercises retrain the muscles that protect the ankle during sport and daily activity.
Phase 4: Return to Sport or Activity
The final stage prepares the ankle for higher loads and impact.
This might involve:
- hopping drills
- running progressions
- agility training
- change-of-direction exercises
Returning too early is a common cause of recurrent ankle sprains, so gradual progression is key.
A Recent Patient Success Story
We recently saw a patient in our clinic who had been struggling with high ankle sprain recovery for over six weeks.
He came to see us at X-Physio in Frenchs Forest NSW after injuring his ankle playing social football.
The patient travelled from Belrose, a nearby suburb, because he was frustrated that the pain simply wasn’t improving.
His symptoms included:
- pain above the ankle joint
- difficulty pushing off when walking
- swelling after activity
- weakness during single-leg movements
Assessment confirmed a syndesmosis (high ankle) sprain.
We started a structured physiotherapy program that included:
- ankle joint mobilisation
- strength and stability exercises
- progressive loading
- return-to-running drills
Within three weeks, he reported significant improvements in:
- pain levels
- ankle strength
- walking tolerance
By week five, he had returned to light jogging and training.
This is a great example of how targeted physiotherapy can accelerate high ankle sprain recovery and help patients return to the activities they enjoy.
What Happens If a High Ankle Sprain Is Left Untreated?
Ignoring the injury or returning to activity too early can lead to long-term problems.
Potential complications include:
- chronic ankle instability
- persistent pain
- reduced ankle mobility
- recurring ankle sprains
- early ankle arthritis
Proper rehabilitation dramatically reduces these risks.
When Should You See a Physiotherapist?
You should seek assessment if:
- ankle pain lasts longer than 5–7 days
- swelling keeps returning
- walking is painful or unstable
- sport or exercise aggravates symptoms
- you suspect a high ankle sprain
Early assessment ensures the correct diagnosis and treatment plan.
Key Takeaways
A high ankle sprain is more complex than a standard ankle sprain and often takes longer to heal.
Because the ligaments connect the lower leg bones, they experience stress with every step.
The good news is that physiotherapy can significantly speed up recovery and help prevent long-term ankle problems.
If your ankle sprain isn’t improving as expected, getting the right treatment early can make a huge difference.
FAQs About High Ankle Sprain Recovery
How do I know if I have a high ankle sprain?
High ankle sprains typically cause pain above the ankle joint, particularly when twisting the foot outward or pushing off while walking or running. Swelling and instability may also occur.
How long does high ankle sprain recovery take?
Recovery can take 4–12 weeks depending on the severity of the ligament injury. Severe cases may take longer, particularly for athletes returning to sport.
Can I walk on a high ankle sprain?
Some people can walk, but it is often painful and unstable. Continuing to walk on the injury without proper treatment may delay recovery and worsen ligament damage.
Do high ankle sprains require surgery?
Most high ankle sprains recover with physiotherapy and conservative treatment. Surgery is only required in severe cases where the ligaments are completely torn or the bones become unstable.
Does physiotherapy help high ankle sprain recovery?
Yes. Physiotherapy helps restore mobility, strength, and stability, which speeds recovery and reduces the risk of ongoing ankle problems.
References
- https://www.sportsmedtoday.com/high-ankle-sprains-va-236.htm
- https://my.clevelandclinic.org/health/diseases/21868-high-ankle-sprain
- https://www.physio-pedia.com/Syndesmotic_Ankle_Sprain
- https://www.foothealthfacts.org/conditions/high-ankle-sprain
- https://xphysio.com.au/blog/
Give us a call today on 9806 3077, or book online, just CLICK HERE:
https://x-physio.au4.cliniko.com/bookings#service
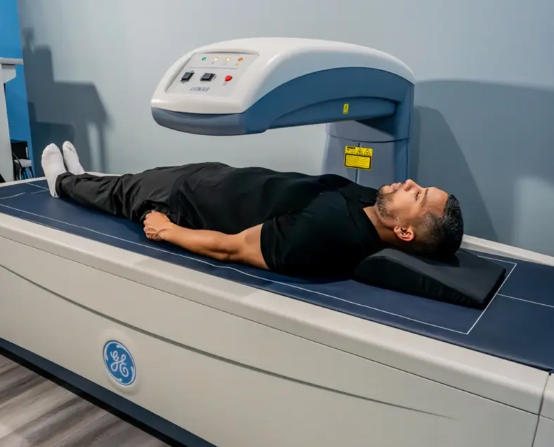
Osteopenia is an early stage of bone loss that can quietly increase your risk of fractures if left untreated. The good news? With the right exercise, lifestyle changes, and physiotherapy guidance, you can slow – and sometimes even reverse – bone loss. In this blog, we’ll explain what osteopenia is and how physiotherapy can help keep your bones strong.
What is Osteopenia?
Osteopenia is a condition where bone mineral density is lower than normal, but not low enough to be classified as osteoporosis. To learn more about osteoporosis, read our blog HERE.
Think of it as a warning sign that your bones are starting to lose strength. If nothing is done, osteopenia can progress to osteoporosis, which significantly increases the risk of fractures.
Bones are constantly renewing themselves. Old bone tissue is broken down and replaced with new bone. As we age, the balance can shift so that bone is lost faster than it is rebuilt.
This gradual loss leads to weaker bones.
A bone density scan (DEXA scan) measures bone density and gives a T-score:
- Normal: Above -1
- Osteopenia: Between -1 and -2.5
- Osteoporosis: Below -2.5
Many people only discover osteopenia during routine screening or after an unexpected fracture.
The key message is simple: osteopenia is the best time to intervene before major bone loss occurs.
Why Osteopenia Matters
Bone health is often overlooked because osteopenia usually has no symptoms.
You won’t feel your bones getting weaker.
However, the consequences can be serious if bone density continues to decline.
People with osteopenia have an increased risk of:
- Wrist fractures
- Hip fractures
- Spinal compression fractures
- Height loss
- Chronic back pain
Hip fractures in particular can be life-changing and are associated with loss of independence in older adults.
The good news is that bone loss is highly responsive to exercise, which is where physiotherapy plays a major role.
What Causes Osteopenia?
Several factors contribute to reduced bone density.
Ageing
Bone density naturally peaks around age 30. After that, bone loss slowly begins.
Hormonal Changes
Hormonal changes play a major role, particularly after menopause.
Lower oestrogen levels accelerate bone loss in women.
Physical Inactivity
Bones respond to load. Without regular weight-bearing activity, bone strength declines.
Sedentary lifestyles significantly increase the risk of osteopenia.
Poor Nutrition
Bones require key nutrients including:
- Calcium
- Vitamin D
- Protein
- Magnesium
Low intake of these nutrients can contribute to bone loss.
Medical Conditions
Certain conditions increase risk:
- Thyroid disorders
- Rheumatoid arthritis
- Coeliac disease
- Hormonal disorders
Medications
Long-term use of some medications can affect bone density, including:
- Corticosteroids
- Some cancer treatments
- Certain anticonvulsants

Symptoms of Osteopenia
Osteopenia is often called a “silent condition” because symptoms rarely appear until bone loss becomes more severe.
However, some warning signs may include:
- Reduced height
- Poor posture
- Back pain from vertebral compression
- Fractures from minor trauma
Many people are diagnosed after having a DEXA scan recommended by their GP.

How Physiotherapy Helps Osteopenia
Physiotherapy is one of the most effective non-medication treatments for osteopenia.
Exercise stimulates bone cells to produce stronger bone tissue. This process is known as bone remodelling.
When bones experience controlled stress through exercise, they respond by becoming stronger.
A physiotherapy program focuses on several key areas.
1. Weight-Bearing Exercise
Weight-bearing exercises force the skeleton to support body weight.
Examples include:
- Walking
- Stair climbing
- Hiking
- Light jogging
- Dancing
These activities stimulate bone growth in the hips and spine.
2. Resistance Training
Strength training places controlled load through bones via muscles.
Research consistently shows resistance training improves bone density.
Examples include:
- Squats
- Lunges
- Step ups
- Deadlifts
- Resistance bands
- Weight machines
A physiotherapist ensures exercises are performed safely and progressively.
3. Balance Training
Falls are the leading cause of fractures.
Improving balance significantly reduces fracture risk.
Balance training may include:
- Single-leg standing
- Stability exercises
- Core strengthening
- Proprioception drills
4. Posture Correction
Poor posture increases spinal compression forces and fracture risk.
Physiotherapy helps strengthen the muscles that support the spine.
This improves:
- Spinal alignment
- Breathing mechanics
- Overall movement efficiency
5. Education and Lifestyle Advice
Physiotherapists provide guidance on:
- Safe exercise progression
- Activity modifications
- Bone-friendly habits
- Fall prevention strategies
A Real Patient Story From Our Clinic
Recently, we saw a patient named Sarah (name changed for privacy) who travelled from Belrose, a suburb close to Frenchs Forest, after being diagnosed with osteopenia during a routine health check.
She was in her early 60s and had always considered herself relatively active, but a DEXA scan revealed her bone density had dropped into the osteopenia range.
Sarah’s biggest concern was that her mother had suffered a hip fracture in her seventies.
After an initial physiotherapy assessment in Frenchs Forest NSW, we identified several issues:
- Reduced lower limb strength
- Poor single-leg balance
- Forward-rounded posture
- Low confidence with strength training
We designed a structured physiotherapy program focusing on:
- Progressive resistance training
- Hip and spinal loading exercises
- Balance training
- Postural strengthening
Over the next three months, Sarah attended physiotherapy and completed a home exercise program.
The results were excellent.
She reported:
- Improved strength
- Better balance
- Increased confidence with exercise
- No fear of lifting weights
Most importantly, she had developed a long-term exercise routine that will help protect her bones for years to come.
The Best Exercises for Osteopenia
The most effective exercise programs combine three key components.
Strength Training
Strength training should ideally be performed 2–3 times per week.
Key exercises include:
- Squats
- Lunges
- Step-ups
- Deadlifts
- Rows
- Overhead press
These exercises load the skeleton and stimulate bone growth.

Impact Training
Low to moderate impact helps stimulate bone density.
Examples include:
- Brisk walking
- Jogging
- Skipping
- Small jumps
These should be introduced gradually and supervised if needed.
Balance and Stability Work
Improving balance reduces the risk of falls.
Exercises may include:
- Heel-to-toe walking
- Single-leg balance
- Stability ball work
- Core strengthening
Lifestyle Tips to Protect Bone Health
Exercise works best when combined with healthy lifestyle habits.
Calcium Intake
Adults generally require around 1000–1300 mg of calcium per day.
Good sources include:
- Dairy products
- Almonds
- Leafy greens
- Tofu
- Sardines
Vitamin D
Vitamin D helps the body absorb calcium.
Sun exposure and supplementation may be required depending on levels.
Protein Intake
Protein is essential for maintaining bone and muscle.
Include adequate protein with each meal.
Avoid Smoking
Smoking significantly accelerates bone loss.
Limit Alcohol
Excessive alcohol intake negatively affects bone health.
When Should You See a Physiotherapist?
You should consider physiotherapy if:
- You have been diagnosed with osteopenia
- You have low bone density
- You want a safe strength training program
- You have had previous fractures
- You are worried about falls
- You want to prevent osteoporosis
Early intervention can make a huge difference to long-term bone health.
The Takeaway
Osteopenia is a warning sign that your bones need attention, but it is also a valuable opportunity to take action before osteoporosis develops.
With the right physiotherapy program, strength training, and lifestyle changes, you can slow bone loss and significantly reduce fracture risk.
If you’ve recently been diagnosed with osteopenia or want to protect your bone health, physiotherapy can help you develop a safe and effective exercise plan tailored to your needs.
FAQs About Osteopenia
What is osteopenia?
Osteopenia is a condition where bone mineral density is lower than normal but not low enough to be diagnosed as osteoporosis. It is considered an early stage of bone loss and increases the risk of fractures if untreated.
Can osteopenia be reversed?
In many cases, bone density can improve with the right combination of resistance training, weight-bearing exercise, adequate nutrition, and medical management.
What exercises are best for osteopenia?
The most effective exercises include resistance training, weight-bearing activity such as walking, and balance exercises to reduce fall risk.
How is osteopenia diagnosed?
Osteopenia is diagnosed using a DEXA bone density scan, which measures bone mineral density and provides a T-score.
Should people with osteopenia lift weights?
Yes. Strength training is one of the most effective ways to improve bone density. However, exercises should be introduced gradually and ideally under physiotherapy supervision.
References
- Osteoporosis Australia – Bone Health Resources
https://healthybonesaustralia.org.au - Royal Australian College of General Practitioners – Osteoporosis Management
https://www.racgp.org.au - International Osteoporosis Foundation
https://www.osteoporosis.foundation - Mayo Clinic – Osteopenia Overview
https://www.mayoclinic.org - National Institutes of Health – Bone Health and Exercise
https://www.nih.gov
Give us a call today on 9806 3077, or book online, just CLICK HERE
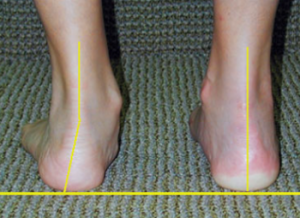
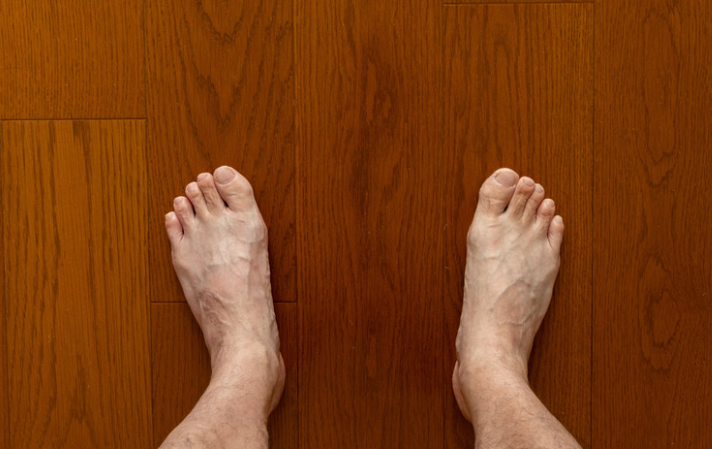
If you’ve developed aching along the inside of your ankle and your arch seems to be collapsing, you might be dealing with posterior tibial tendon dysfunction physiotherapy could help fix. This common but often missed condition is a leading cause of adult flat foot pain — and the earlier you treat it, the better the outcome.
Why Your Arch Is Suddenly Dropping
Adult flat foot doesn’t usually happen overnight. Most people don’t wake up one day with a completely collapsed arch. It’s gradual.
One of the biggest culprits? Posterior Tibial Tendon Dysfunction (PTTD) — now often referred to as Progressive Collapsing Foot Deformity.
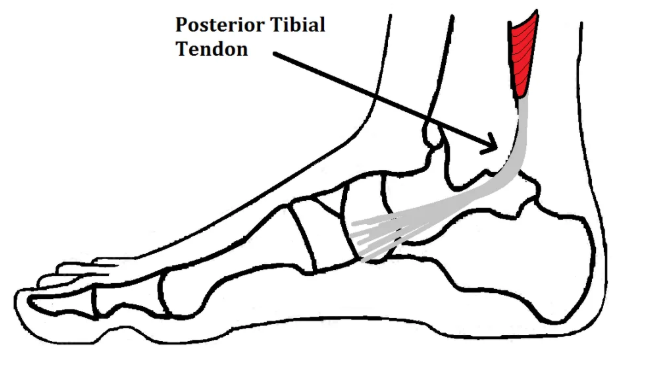
The posterior tibial tendon runs from a key calf muscle (tibialis posterior), behind the inside ankle bone, and attaches into the arch of your foot. Its job is simple but critical:
- Support your arch
- Control foot position while walking
- Help you push off when you step
When this tendon becomes overloaded, irritated, or degenerative, it can’t hold the arch up anymore. The result? Pain, weakness, and flattening of the foot.
What Is Posterior Tibial Tendon Dysfunction?
Posterior Tibial Tendon Dysfunction is a condition where the tendon gradually becomes:
- Inflamed (early stage)
- Thickened and degenerative
- Weak and unable to support the arch
Over time, this leads to:
- Arch collapse
- Heel drifting outward
- Forefoot turning outward
- Difficulty standing on one leg
- Trouble doing a single heel raise
If untreated, it can become rigid and arthritic.
This is why early posterior tibial tendon dysfunction physiotherapy is crucial.
Who Is Most At Risk?
PTTD is more common in:
- Adults over 40
- Women
- Runners and walkers
- People who stand all day for work
- Those with previous ankle sprains
- People with higher body weight
- Diabetics
We commonly see it in busy tradies, nurses, teachers, and parents who are constantly on their feet.
The Early Warning Signs
Most patients tell us:
- “It started as a dull ache along the inside of my ankle.”
- “My foot feels tired and heavy.”
- “My shoes are wearing unevenly.”
- “My arch looks flatter than the other side.”
A big red flag is pain behind the inside ankle bone (medial malleolus) that worsens with walking.
Another key test: try standing on one leg and doing a heel raise. If the heel doesn’t roll inward or you can’t lift at all — that’s often posterior tibial tendon dysfunction.
What Happens If You Ignore It?
Here’s the tough truth.
If untreated, posterior tibial tendon dysfunction can progress through stages:
Stage 1
Painful tendon but normal foot shape.
Stage 2
Arch collapse begins. Foot becomes flexible flat.
Stage 3
Flat foot becomes stiff and arthritic.
Stage 4
Ankle joint involvement develops.
By Stage 3 or 4, surgery is often considered.
This is why conservative management early is so important.
How Physiotherapy Fixes Posterior Tibial Tendon Dysfunction
The good news? Most cases respond very well to targeted physiotherapy.
At our Frenchs Forest clinic, our approach to posterior tibial tendon dysfunction physiotherapy focuses on:
1. Reducing Tendon Load
Early on, we may modify activity and temporarily reduce aggravating loads. That doesn’t mean complete rest — it means smart load management.
2. Strengthening the Tibialis Posterior
The tendon needs progressive loading. Research shows tendons respond positively to the right strengthening program.
Key exercises include:
- Resisted foot inversion
- Heel raises (progressing to single-leg)
- Slow controlled calf raises
- Arch control drills
3. Foot Intrinsic Muscle Training
Strengthening the small stabilisers in the foot helps support the arch naturally.
4. Ankle and Calf Mobility
Restricted ankle dorsiflexion increases strain on the tendon. Improving mobility reduces stress.
5. Taping or Temporary Orthotics
Short-term arch support can unload the tendon while it heals.
6. Gait Retraining
Subtle walking changes can significantly reduce medial foot overload.
A Recent Patient Story (Frenchs Forest NSW)
Recently, we saw a 52-year-old woman who travelled from a surrounding suburb near Frenchs Forest NSW. She works in retail and stands all day.
She came in with:
- 6 months of inner ankle pain
- Progressive flattening of her right arch
- Inability to do a single heel raise
- Increasing difficulty walking more than 20 minutes
She had been told she “just had flat feet.”
After assessment, we diagnosed Stage 2 posterior tibial tendon dysfunction.
Her treatment plan included:
- Load modification (reducing long walking initially)
- Structured strengthening program
- Calf and tibialis posterior progressive loading
- Temporary arch taping
- Education around footwear
Within 4 weeks, pain reduced significantly.
By 8 weeks, she could perform 15 single-leg heel raises.
At 12 weeks, she returned to full work shifts pain-free.
The key? Early, progressive physiotherapy rather than ignoring it or relying purely on passive supports.
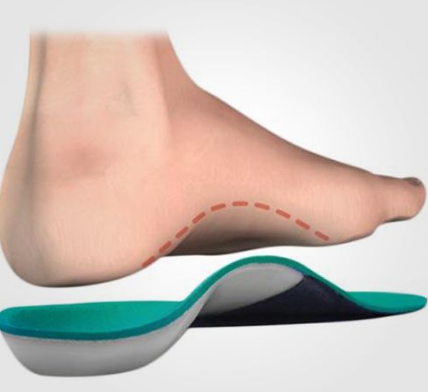
Do Orthotics Fix It?
Orthotics can help — but they are not the full solution.
They reduce strain on the tendon temporarily. However:
- They don’t strengthen the tendon
- They don’t improve muscle control
- They don’t address mobility deficits
The best outcomes occur when orthotics are combined with active rehabilitation.
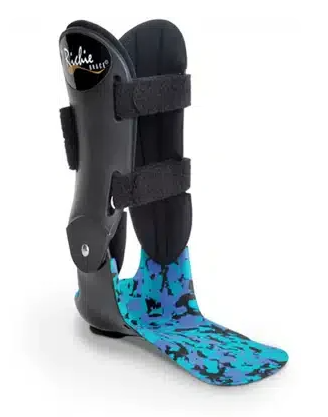
What is a Richie Brace?
In more advanced or stubborn cases, we sometimes discuss the use of a Richie Brace. A Richie Brace is a custom-made ankle-foot orthosis (AFO) that combines a supportive foot orthotic with semi-rigid uprights that stabilise the ankle. It’s typically used in moderate to more advanced posterior tibial tendon dysfunction where the arch is significantly collapsing and the tendon needs substantial offloading. The goal isn’t to rely on it forever — it’s to reduce strain enough to calm symptoms while we continue strengthening and rehabilitation. For some patients, particularly those wanting to avoid surgery, a Richie Brace can be an effective middle-ground option alongside physiotherapy.
Can It Heal Without Surgery?
Yes — especially in Stages 1 and 2.
Evidence supports exercise-based tendon rehab for tendon dysfunction conditions, similar to what we use in Achilles and patellar tendinopathy.
Surgery is usually considered only when:
- Conservative care fails
- Deformity becomes rigid
- Severe arthritis develops
Most people we see respond well to a 8–16 week progressive rehab program.
Footwear Matters More Than You Think
Shoes that are:
- Too flexible
- Worn out
- Completely flat
- Minimal support
can worsen tendon overload.
We often recommend:
- Firm heel counter
- Mild arch support
- Structured midsole
- Avoiding very flexible minimalist shoes during rehab
How Long Does Recovery Take?
It depends on:
- Stage of dysfunction
- Duration of symptoms
- Compliance with rehab
- Body load and activity demands
General guide:
- Mild cases: 6–8 weeks
- Moderate cases: 8–16 weeks
- Chronic cases: 3–6 months
Consistency is key.
Why Early Physiotherapy Matters
The longer you wait:
- The more the arch collapses
- The harder it becomes to reverse
- The greater the risk of joint damage
Early posterior tibial tendon dysfunction physiotherapy can stop progression and restore strength before permanent changes occur.
When Should You Book In?
You should get assessed if:
- You have pain along the inside of your ankle
- Your arch is dropping
- You struggle with heel raises
- Walking distance is reducing
- You’ve had repeated ankle sprains
Don’t wait until it becomes rigid and painful daily.
FAQs – Posterior Tibial Tendon Dysfunction
What is posterior tibial tendon dysfunction?
Posterior tibial tendon dysfunction is a condition where the tendon supporting your arch becomes inflamed or degenerative, leading to adult flat foot and inner ankle pain.
Can physiotherapy fix posterior tibial tendon dysfunction?
Yes. Early-stage PTTD responds very well to progressive strengthening, load management, and foot control retraining.
How long does posterior tibial tendon dysfunction take to heal?
Most cases improve within 8–16 weeks with consistent physiotherapy. More advanced cases may take longer.
Do I need orthotics for posterior tibial tendon dysfunction?
Orthotics can help reduce strain but work best when combined with strengthening and rehabilitation exercises.
Can posterior tibial tendon dysfunction cause permanent flat feet?
If left untreated, it can lead to progressive arch collapse and arthritis. Early treatment reduces this risk significantly.
References
- American Academy of Orthopaedic Surgeons – Posterior Tibial Tendon Dysfunction
https://orthoinfo.aaos.org - Cleveland Clinic – Posterior Tibial Tendonitis
https://my.clevelandclinic.org - Journal of Orthopaedic & Sports Physical Therapy – Tendon Rehabilitation Guidelines
https://www.jospt.org - X-Physio Blog – Snapping Hip Syndrome
https://xphysio.com.au/blog
If you’re noticing arch collapse or inside ankle pain, don’t wait for it to get worse.
Give us a call today on 9806 3077, or book online, just CLICK HERE: https://x-physio.au4.cliniko.com/bookings#service
Woken up and suddenly can’t turn your head? You’ve likely developed a wry neck (acute torticollis). It’s painful, stiff, and frustrating — but the good news is it’s usually very treatable. In this blog, we’ll explain exactly what causes it, what to do immediately, and how physiotherapy can speed up your recovery.
Woke Up Crooked? You’re Not Alone.
There’s nothing quite like that moment.
You roll over in bed… and realise your neck won’t move. One side feels locked. Turning your head sends a sharp jolt of pain. You’re stuck looking slightly sideways like you’ve permanently spotted something interesting.
This is wry neck, also known as acute torticollis — a common condition we see regularly in clinic.
The good news?
It’s rarely serious.
And with the right wry neck treatment, most people improve quickly.
Let’s break it down.

What Is Wry Neck (Acute Torticollis)?
Wry neck is a sudden onset neck spasm that causes your head to tilt or rotate to one side. The medical term is acute torticollis.
It usually:
- Appears suddenly (often overnight)
- Causes sharp pain on one side of the neck
- Limits rotation (you can’t turn your head properly)
- Feels “locked” or stuck
The muscles most commonly involved include:
- Upper trapezius
- Levator scapulae
- Sternocleidomastoid
- Deep cervical muscles
When these muscles go into protective spasm, movement becomes painful and restricted.
What Causes Wry Neck?
Most cases happen for simple mechanical reasons. Common triggers include:
1. Sleeping Position
Awkward pillow height or sleeping twisted can irritate joints and soft tissues.
2. Sudden Movement
Quick head turn, sport, gym movement, or even reversing the car.
3. Joint Irritation
Minor facet joint irritation in the cervical spine can trigger reflex muscle spasm.
4. Stress & Tension
High stress can increase muscle tone in the neck and shoulders.
5. Prolonged Posture
Long hours at a desk, laptop, or phone can overload neck structures.
It’s often a combination of factors rather than one clear cause.

What’s Actually Happening in Your Neck?
In simple terms:
- A small joint or structure becomes irritated.
- The nervous system reacts.
- Muscles tighten to protect the area.
- Movement becomes restricted and painful.
The muscle spasm isn’t the primary problem — it’s your body’s protective response.
That’s why simply stretching aggressively often makes it worse.
What To Do Immediately (First 24–48 Hours)
If you wake up with a wry neck, here’s what we recommend.
✅ Keep Moving (Gently)
Avoid forcing movement, but don’t completely immobilise it either. Small pain-free movements help calm the nervous system.
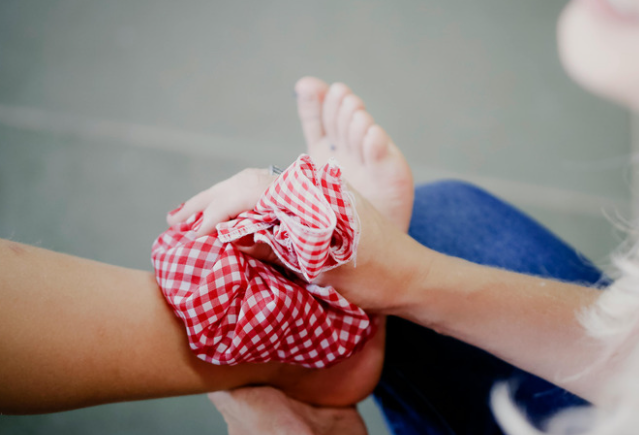
✅ Use Heat
A warm pack for 10–15 minutes can relax muscle spasm.
✅ Simple Pain Relief
Paracetamol or anti-inflammatories (if safe for you) may help.
❌ Avoid Aggressive Stretching
Cranking your head into the painful direction can flare it.
❌ Avoid Complete Rest
Staying still all day stiffens it further.
If it’s not improving within 48–72 hours — or if pain is severe — physiotherapy helps significantly.

When Should You See a Physio?
Seek assessment if:
- Pain is severe
- You can’t rotate your head at all
- It’s not improving after 2–3 days
- You get pins and needles or arm symptoms
- It keeps recurring
Most cases are mechanical and straightforward — but proper assessment ensures nothing more serious is going on.
How Physiotherapy Helps Wry Neck Treatment
This is where we see the biggest improvements.
Effective wry neck treatment isn’t just massage. It’s targeted, specific care.
1. Accurate Diagnosis
We assess:
- Cervical joint mobility
- Muscle tone
- Neural involvement
- Postural drivers
- Contributing factors
2. Gentle Joint Mobilisation
Specific hands-on techniques reduce joint irritation and reset movement.
3. Muscle Release
Targeted soft tissue work reduces protective spasm.
4. Movement Retraining
We guide safe movement patterns to restore normal range.
5. Education
Understanding what’s happening reduces fear and muscle guarding.
A Recent Case From Our Clinic
Just last month, we saw a 42-year-old patient who drove from Roseville to our clinic in Frenchs Forest NSW after waking up unable to turn her head.
She’d slept awkwardly after a long week at work. By morning, her head was stuck rotated to the right. Pain was sharp and she couldn’t check her blind spot while driving.
Assessment showed:
- Acute facet joint irritation
- Significant levator scapulae spasm
- No nerve involvement
We performed:
- Gentle cervical joint mobilisation
- Soft tissue release
- Guided active movement exercises
- Postural advice for her workstation
Within the first session, rotation improved by about 50%.
By her second visit 4 days later, she had near full movement.
One week later, she was back at Pilates pain-free.
This is typical when treatment is early and targeted.
How Long Does Wry Neck Last?
Without treatment:
- Mild cases: 3–7 days
- Moderate cases: 1–2 weeks
With physiotherapy:
- Often significantly reduced
- Faster return to full movement
- Lower chance of recurrence
The key is calming irritation early and restoring normal movement quickly.
Can Wry Neck Become Chronic?
Occasionally, yes — especially if:
- It’s left untreated
- Poor posture persists
- There’s repeated strain
- Underlying cervical stiffness exists
Recurrent episodes usually indicate an underlying mobility or control issue.
That’s where a tailored strengthening program matters.
Exercises for Wry Neck (Once Pain Settles)
These are general examples — individual assessment is best.
1. Gentle Rotation
Turn head slowly toward comfortable range.
10 reps, 3–4 times daily.
2. Chin Tucks
Gently retract chin (like making a double chin).
Hold 5 seconds, repeat 10 times.
3. Scapular Setting
Draw shoulder blades gently back and down.
These help restore control and reduce recurrence risk.

Prevention Tips
To reduce future episodes:
- Optimise pillow height (neutral alignment)
- Avoid stomach sleeping
- Improve desk ergonomics
- Take movement breaks every 30–45 mins
- Strengthen deep neck flexors
- Manage stress load
Small changes make a big difference.
Red Flags (Rare but Important)
Seek urgent medical review if you experience:
- Fever
- Severe headache
- Trauma
- Neurological symptoms
- Unexplained weight loss
- History of cancer
These are uncommon but important to rule out.
Why Early Wry Neck Treatment Matters
The longer muscle spasm persists, the more the nervous system sensitises.
Early physiotherapy:
- Reduces pain faster
- Restores movement sooner
- Prevents compensation patterns
- Lowers recurrence risk
Don’t wait it out unnecessarily.
Frequently Asked Questions (FAQs)
What is the fastest way to fix a wry neck?
Gentle movement, heat, and physiotherapy treatment provide the fastest improvement. Hands-on mobilisation combined with guided exercises usually speeds recovery significantly.
Should I massage a wry neck?
Light massage may help, but aggressive pressure can worsen irritation. It’s best combined with joint mobilisation and movement therapy.
Is wry neck serious?
In most cases, no. It’s usually a temporary mechanical issue. However, if symptoms are severe or accompanied by neurological signs, seek assessment.
Can I exercise with a wry neck?
Avoid intense workouts initially. Gentle movement is beneficial, but heavy lifting or high-impact activity should wait until pain settles.
How many physio sessions do I need?
Many patients improve within 1–3 sessions depending on severity.
References
- https://www.healthdirect.gov.au/torticollis
- https://www.nhs.uk/conditions/torticollis/
- https://www.physio-pedia.com/Torticollis
- https://xphysio.com.au/blog/
If you’ve woken up stuck and sore — don’t just wait and hope.
Early, targeted wry neck treatment makes a huge difference.
Give us a call today on 9806 3077, or book online, just CLICK HERE:
https://x-physio.au4.cliniko.com/bookings#service
Snapping hip syndrome is a common cause of clicking, flicking or popping around the hip — especially in runners, dancers and gym-goers. While it’s often painless at first, it can become irritating and stubborn. The good news? With the right physiotherapy approach, you can settle it down and stop the click for good.
That Annoying Click in the Hip…
You’re walking up stairs.
You swing your leg out of the car.
You go to stand up after sitting.
Click.
If that sound (or feeling) keeps happening around the front or side of your hip, you might be dealing with snapping hip syndrome.
For some people, it’s just a harmless noise. For others, it becomes painful, inflamed and frustrating — especially when it starts limiting training or daily movement.
Let’s break down what’s actually happening, why it won’t go away on its own, and how physiotherapy can fix it properly.
What Is Snapping Hip Syndrome?
Snapping hip syndrome (sometimes called coxa saltans) is when a tendon flicks over a bony structure in the hip, creating a snapping or clicking sensation.
There are three main types:
1️⃣ External Snapping Hip
The most common type.
The iliotibial band (ITB) or gluteus maximus tendon snaps over the outside of the hip bone (greater trochanter).
You’ll usually feel:
- A snap on the outside of the hip
- Clicking when walking or running
- Tenderness on the side of the hip
This often overlaps with ITB irritation or lateral hip pain.
2️⃣ Internal Snapping Hip
This happens when the iliopsoas tendon flicks over structures at the front of the hip.
You’ll notice:
- A deep click in the front of the hip
- Snapping when lifting the knee
- Clicking getting out of a car
- Tight hip flexors
This is common in runners, dancers and people who sit a lot.
3️⃣ Intra-Articular Snapping
Less common, but more serious.
This involves something inside the joint — like a labral tear or cartilage issue.
These patients often describe:
- Catching or locking
- Deep joint pain
- Reduced hip range
- Sharp pain with twisting
This type requires careful assessment and sometimes imaging.
Why Does Snapping Hip Syndrome Happen?
Snapping hip syndrome usually develops because of:
- Muscle tightness (especially hip flexors or ITB)
- Weak glutes
- Poor pelvic control
- Overtraining
- Sudden training load increases
- Biomechanical overload
- Long hours sitting
In active Australians, it’s often a mix of tight hip flexors + weak glutes + increased training volume.
The tendon starts to flick repeatedly over bone — and over time that repeated friction causes irritation and inflammation.
That’s when the painless click becomes painful snapping.
If the hip is not snapping but is sore on the outside, READ THIS BLOG
Why It Won’t Just “Go Away”
Here’s the trap.
Many people think:
“It’s just a click. I’ll stretch it.”
But stretching alone rarely fixes snapping hip syndrome.
Why?
Because the underlying problem isn’t just tightness. It’s usually:
- Load imbalance
- Weak lateral hip stabilisers
- Poor movement control
- Pelvic positioning issues
Unless you address those, the tendon keeps snapping.
And if it continues long enough, you can develop:
- Trochanteric bursitis
- Hip flexor tendinopathy
- Gluteal tendinopathy
- Ongoing hip pain with sport
That’s why early physio treatment makes such a big difference.

What We Saw Recently in Clinic (Real Patient Example)
A 32-year-old runner came to see us from a nearby Northern Beaches suburb to our clinic in Frenchs Forest NSW.
She’d had a clicking hip for about 8 months.
At first it was painless. Then it started aching after long runs.
Eventually, she felt sharp snapping every time she lifted her knee.
She had:
- Tight hip flexors
- Weak glute medius
- Reduced single-leg control
- Poor pelvic stability on running assessment
Her MRI was clear — no labral tear. That was good news.
We treated her snapping hip syndrome with:
- Targeted hip flexor release
- Progressive glute strengthening
- Pelvic stability retraining
- Running load modification
- Gradual return-to-run programming
Within 4 weeks:
- Clicking reduced significantly
- Pain resolved
- Running tolerance improved
By 8 weeks:
- No snapping during daily movement
- Returned to full training
The key wasn’t stretching alone. It was correcting the underlying load and control problem.
How Physiotherapy Fixes Snapping Hip Syndrome
Here’s how we approach snapping hip syndrome properly.
1️⃣ Accurate Diagnosis
First, we determine:
- External vs internal vs intra-articular
- Is it painful or just audible?
- Is there tendon irritation?
- Do we need imaging?
A proper assessment prevents misdiagnosis.
2️⃣ Reduce Irritation
Early stage management may include:
- Activity modification
- Load reduction
- Soft tissue release
- Dry needling (if appropriate)
- Taping strategies
The goal: calm the tissue down.
3️⃣ Restore Strength
This is where most people fall short.
We focus heavily on:
- Glute medius
- Glute max
- Deep hip rotators
- Core stability
- Single-leg strength
Strength reduces the flicking force over the bone.
4️⃣ Improve Movement Control
We retrain:
- Single-leg squats
- Running gait
- Pelvic positioning
- Hip hinge mechanics
Movement retraining is often the missing piece.
5️⃣ Return to Sport Plan
For runners and athletes:
- Controlled load progression
- Monitoring symptoms
- Specific hip capacity work
This prevents recurrence.
Can You Exercise Through It?
If snapping hip syndrome is painless, you can often continue training with modifications.
If it’s painful:
- Avoid repeated snapping motions
- Reduce hills or speed work
- Avoid deep hip flexion temporarily
Painful snapping should not be ignored — especially if worsening.
How Long Does It Take to Fix?
Typical timelines:
- Mild cases: 3–6 weeks
- Moderate cases: 6–10 weeks
- Long-standing cases: 8–12+ weeks
The longer it’s been present, the longer it usually takes to correct.
When Should You Be Concerned?
Seek assessment if you notice:
- Locking or catching
- Sharp groin pain
- Sudden onset after trauma
- Persistent swelling
- Pain that doesn’t settle
These may indicate intra-articular involvement.

Self-Management Tips (That Actually Help)
If you suspect snapping hip syndrome:
✔ Strengthen glutes (not just stretch hip flexors)
✔ Avoid aggressive stretching if painful
✔ Reduce load temporarily
✔ Work on single-leg stability
✔ Don’t ignore progressive symptoms
But if it’s been there more than a few weeks — get it assessed.
Why Early Treatment Matters
When treated early, snapping hip syndrome responds very well.
Left untreated, it can turn into:
- Chronic lateral hip pain
- Tendinopathy
- Ongoing running issues
- Compensatory knee or back pain
Fix the cause, not just the click.
The Bottom Line
Snapping hip syndrome is common, annoying, and very fixable.
The clicking hip that “won’t go away” usually sticks around because the underlying strength and control issues haven’t been addressed.
With targeted physiotherapy, proper loading and progressive strength work, most people return to full activity without surgery.
If your hip keeps clicking — and especially if it’s starting to hurt — don’t wait.
FAQs About Snapping Hip Syndrome
What is snapping hip syndrome?
Snapping hip syndrome is a condition where a tendon flicks over a bony structure in the hip, causing a clicking or snapping sensation. It can be painless or painful and is common in runners and active individuals.
Is snapping hip syndrome serious?
It is usually not serious, especially if painless. However, if it becomes painful or is associated with locking or catching, it should be assessed by a physiotherapist or doctor.
Can snapping hip syndrome go away on its own?
Mild painless snapping may settle with load reduction. Painful snapping hip syndrome typically requires physiotherapy to correct muscle imbalances and movement control issues.
What exercises help snapping hip syndrome?
Glute strengthening, pelvic stability exercises, and controlled single-leg training are most effective. Stretching alone is rarely enough.
Do I need surgery for snapping hip syndrome?
Surgery is rarely required. Most cases respond well to physiotherapy and structured rehabilitation.
References
- https://www.physio-pedia.com/Snapping_Hip_Syndrome
- https://orthoinfo.aaos.org/en/diseases–conditions/snapping-hip/
- https://www.sportsinjuryclinic.net/sport-injuries/hip-groin-pain/snapping-hip
If you’re dealing with snapping hip syndrome and it’s not settling, our physios in Frenchs Forest can help identify the cause and build a clear plan to get you back to full strength.
Give us a call today on 9806 3077, or book online, just CLICK HERE: https://x-physio.au4.cliniko.com/bookings#service
A bone bruise is deeper than a muscle strain but not quite a fracture — which is exactly why it hangs around. The bone’s internal structure gets damaged and heals slowly. In this guide we’ll explain why pain lingers, what speeds recovery up, and how physio gets you moving sooner. If your injury isn’t settling… keep reading.
What is a Bone Bruise?
A bone bruise (also called a bone contusion) is damage to the inside of the bone.
Think of bone like a honeycomb — not solid concrete. When force hits it (fall, tackle, twist, awkward landing), tiny internal trabeculae collapse and bleed.
You haven’t broken the bone — but you’ve injured the structure.
That’s why it hurts far more than a sprain but looks normal on X-ray.
Bone bruises commonly occur in:
- Knee (most common — especially after sport)
- Heel after landing
- Hip after a fall
- Wrist after catching yourself
- Ankle after rolling it
- Shoulder after impact
Why Does a Bone Bruise Hurt for So Long?
This is the big frustration.
People expect soft tissue healing timelines:
- Muscle: 2–4 weeks
- Ligament: 4–8 weeks
But bone bruises often last 2–6 months.
Here’s why.
1. Bones Have Poor Blood Flow
Muscle heals quickly because it’s rich in blood supply.
Bone marrow? Not so much.
Healing cells physically take longer to arrive.
2. Every Step Compresses the Injury
Unlike a muscle tear where rest helps — you load bones every time you stand, walk, or climb stairs.
So the injury gets micro-irritated daily.
3. Swelling is Trapped Inside Bone
Soft tissue swelling can disperse.
Bone swelling is trapped under rigid cortex → pressure → deep aching pain.
That classic complaint:
“It feels bruised inside, especially at night.”
Exactly right.
4. MRI Changes Persist After Symptoms Improve
A key point — pain and healing don’t progress together.
Even once you feel better, bone remodelling continues for months.
Return too fast → flare up.
This is where physiotherapy becomes critical.
Symptoms of a Bone Bruise
Typical features include:
- Deep ache rather than sharp pain
- Pain with weight-bearing
- Worse after activity, stiff the next day
- Night throbbing
- Localised tenderness over bone
- Swelling without major instability
- Slow improvement plateau
The giveaway sign:
You were improving… then it just stopped.
Classic bone bruise behaviour.
To find out more info about a bone fracture, CLICK HERE
Why Rest Alone Doesn’t Fix It
Many people are told:
“Just rest and let it heal.”
The problem?
Total rest weakens the surrounding muscles → more load goes through the bone → recovery slows.
Bone actually heals best with controlled progressive loading.
Not zero load.
Not full sport.
But smart loading.
That’s physiotherapy.

How Physiotherapy Speeds Bone Bruise Recovery
At our clinic in Frenchs Forest, we manage bone bruises weekly — especially knees and heels.
Physio treatment works in 4 stages.
Stage 1 — Settle Irritation (Week 0–2)
Goal: Reduce internal bone pressure
We use:
- Load modification (not full rest)
- Crutch or taping advice
- Range of motion drills
- Muscle activation without compression
- Pool walking or cycling
- Pain-guided activity limits
Important:
You should still move — just not aggravate.
Stage 2 — Restore Movement (Week 2–6)
Now we improve joint mechanics so force spreads better.
Common problems:
- Stiff ankle → overload knee bone bruise
- Weak glutes → overload hip
- Poor quad control → overload patella
Treatment includes:
- Joint mobilisation
- Strength activation patterns
- Gait retraining
- Controlled weight-bearing progressions
Pain often drops dramatically here.
Stage 3 — Load the Bone Properly (Week 4–10)
This is the most important stage — and the one most people skip.
Bone remodels in response to progressive compression.
We introduce:
- Isometric loading
- Slow resistance strength
- Step-down progressions
- Controlled impact preparation
This stimulates healing instead of delaying it.
Stage 4 — Return to Impact (Week 8–16+)
Gradual return:
- Jog → run intervals
- Landing mechanics
- Deceleration training
- Sport-specific drills
Skipping this stage = relapse.
Real Patient Example
A 34-year-old runner came to us from Belrose with persistent knee pain after slipping on wet tiles 8 weeks earlier.
They’d been told:
“Probably just bruised — give it time.”
But time didn’t help.
Findings
- MRI: medial femoral condyle bone bruise
- Quad inhibition
- Avoidance gait
- Pain climbing stairs
- Unable to run
Treatment Plan
Weeks 1–2
Unload + restore quad activation
Weeks 3–6
Strength + controlled knee loading
Weeks 6–10
Running re-introduction program
Weeks 10–12
Return to park run
Outcome
- Running 5km pain-free
- No swelling
- Confidence restored
The biggest change?
They stopped resting completely and started graded loading.
Exercises That Help Bone Bruise Recovery
(Always guided — wrong load irritates bone)
Early Phase
- Static quad holds
- Glute bridges
- Heel slides
- Pool walking
Mid Phase
- Sit-to-stands
- Step-ups
- Resistance band walking
- Leg press (partial range)
Late Phase
- Split squats
- Single leg deadlifts
- Hopping drills
- Jog progressions
What Makes Bone Bruises Worse?
Avoid these mistakes:
❌ Complete rest for weeks
❌ Running “through discomfort”
❌ Stretching aggressively over bone
❌ Returning once pain reduces (too early)
❌ Ignoring strength deficits
How Long Does a Bone Bruise Take to Heal?
Typical timelines:
| Severity | Healing Time |
|---|---|
| Mild | 4–8 weeks |
| Moderate | 2–4 months |
| Severe | 4–9 months |
Key rule:
Pain settles before bone finishes healing.
We progress based on load tolerance — not MRI images.
Do You Need a Scan?
You may need MRI if:
- Pain lasts >4 weeks after impact
- Deep localised tenderness
- Night ache persists
- Swelling unexplained
- X-ray normal but pain severe
X-rays don’t show bone bruises.
Preventing Recurrence
Bone bruises often come back because the real cause wasn’t fixed.
We address:
- Landing mechanics
- Muscle imbalance
- Joint stiffness
- Running load errors
- Foot control
Once corrected → recurrence risk drops massively.
When to See a Physio
Book an assessment if:
- Pain lingers beyond 2–3 weeks
- You plateau in recovery
- Running keeps flaring symptoms
- Night pain persists
- Swelling returns after activity
Early treatment shortens recovery by months.
FAQs About Bone Bruises
How is a bone bruise different from a fracture?
A fracture breaks the bone cortex. A bone bruise damages the internal structure but keeps the outer shell intact.
Can you walk on a bone bruise?
Usually yes — but load must be controlled. Too much walking delays healing.
Should I ice a bone bruise?
Ice helps pain early but won’t speed healing significantly after the first week.
Why does it hurt more at night?
Bone pressure increases when circulation changes and muscles relax.
Can I run with a bone bruise?
Only during staged rehab. Running too early commonly resets recovery.
Do bone bruises show on X-ray?
No. They require MRI.
Does physio actually speed healing?
Yes — by optimising load, strength, and mechanics so bone remodelling occurs faster.
References
- https://www.ncbi.nlm.nih.gov/books/NBK532251/
- https://orthoinfo.aaos.org/en/diseases–conditions/bone-bruise/
- https://www.physio-pedia.com/Bone_Bruise
- https://bjsm.bmj.com/
- https://www.sportsmed.org/
Give us a call today on 9806 3077, or book online, just CLICK HERE
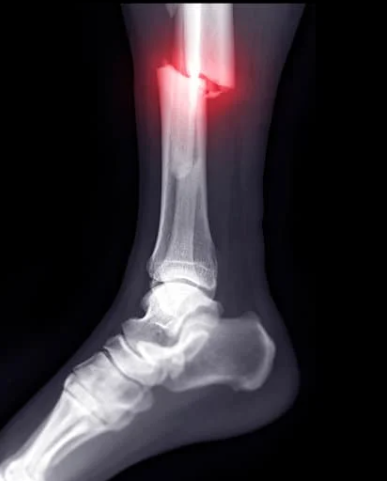
Shin pain after running or sport is usually either shin splints vs stress fracture — but they’re treated very differently. One needs load management and strengthening, the other often needs strict protection. In this blog we’ll show you how physio accurately diagnoses the difference and gets you back to training safely — faster.
If you’ve ever tried to “run through” shin pain, you already know the result… it just gets worse.
One of the most common mistakes we see in clinic is people guessing what their shin pain is. They Google, ice it, rest for a few days, then go back — only to flare it again. Sometimes for months.
Here’s the problem:
shin splints vs stress fracture are easy to confuse — but treating them the same can delay recovery by weeks… or even cause a full fracture.
Let’s break it down clearly.
First — What Actually Hurts In Your Shin?
Your shin bone is the tibia. Around it sit muscles, fascia and bone tissue that all react differently to load.
When running or jumping, the tibia bends slightly with every step. Normally, your body repairs that micro-damage overnight.
But if training load increases faster than your body adapts → tissue overload occurs.
That overload becomes either:
| Condition | Tissue Problem |
|---|---|
| Shin Splints | Irritated muscle & bone lining |
| Stress Fracture | Small crack inside bone |
They start from the same cause — training load error — but end very differently.
What Are Shin Splints vs Stress Fracture? (Medial Tibial Stress Syndrome)
Shin splints vs Stress Fracture is very different. Shin splints is an irritation of the bone lining (periosteum) and muscle attachment along the inside of the shin.
Typical Symptoms
- Dull ache along inner shin
- Pain warms up then settles during exercise
- Worse the next morning
- Tender along a wide area (5–10cm strip)
- Both legs often affected
Most runners describe it as:
“tight, sore, annoying — but I can still run”
That’s why people ignore it… and that’s why it progresses.
What’s Happening Physically
Your calf and deep tibial muscles pull repeatedly on the bone.
Instead of the bone breaking — the attachment tissue becomes irritated.
Think of it as shin overload warning stage.

What Is A Stress Fracture?
A stress fracture is bone fatigue failure — a small crack caused by repetitive loading exceeding bone repair. Shin Splints vs Stress fracture are often mistaken for one another.
Typical Symptoms
- Sharp, localised pain
- Pain increases during activity
- Pain doesn’t warm up
- Hurts hopping
- Often one exact fingertip spot
- Can ache at rest or night
Patients often say:
“It feels like someone is poking the bone”
This is not a warning stage anymore — it’s structural damage.
The Biggest Diagnostic Clue (You Can Try Now)
Hop Test
If hopping is painful → suspect stress fracture
If hopping is uncomfortable but tolerable → more likely shin splints vs stress fracture
But this is NOT enough alone — because missing a stress fracture is risky.
This is exactly where physiotherapy matters.
Why People Misdiagnose Themselves
Most runners think:
“If I can still run, it’s just shin splints”
Unfortunately… that’s wrong.
We regularly see runners continue training on early stress fractures for 4–6 weeks because the pain wasn’t severe initially.
By the time they come in — recovery takes 12 weeks instead of 4.
How Physiotherapy Diagnoses Shin Splints vs Stress Fracture
At XPhysio in Frenchs Forest, we don’t rely on guesswork.
We combine clinical testing + loading history + physical response patterns.
Step 1 — Load History Analysis
We map:
- Weekly distance changes
- Surface change (road → track)
- Shoe changes
- Hill work
- Speed sessions
- Sport pre-season spikes
Stress fractures nearly always follow a sudden spike.
Step 2 — Palpation Mapping
We physically map pain location:
| Finding | Suggests |
|---|---|
| Broad tenderness | Shin splints |
| Fingertip pain | Stress fracture |
Step 3 — Functional Testing
We test:
- Single leg hop
- Calf endurance
- Tibial torsion stress
- Landing mechanics
Stress fractures fail impact tests early.
Step 4 — Medical Imaging (If Needed)
If fracture suspected → GP referral for imaging.
Important note:
Early X-rays are often negative — so we guide correct scan timing.
Treatment Is Completely Different
This is why correct diagnosis matters.
Shin Splints vs stress fracture Treatment
Goal = reduce irritation + improve load capacity
- Activity modification (not full rest)
- Calf strength rebuilding
- Tibial loading progression
- Running retraining
- Foot strike & cadence changes
- Gradual return to running
Recovery: 2–6 weeks
You usually keep training in some capacity.
Stress Fracture Treatment
Goal = protect bone healing
- Impact unloading
- Cross training only
- Staged bone loading program
- Strength rebuild
- Controlled return to impact
Recovery: 6–12+ weeks
Running through it delays healing dramatically.
Real Patient Example
A 29-year-old runner came to us from Dee Why after 8 weeks of persistent shin pain. We had to figure out if it was shin splints vs stress fracture.
They’d been told it was shin splints and kept running 3–4 times per week.
During assessment:
- Fingertip pain over tibia
- Pain hopping
- Increasing night ache
We suspected stress fracture and arranged imaging — confirmed early tibial stress fracture.
Instead of needing 3 months off, we:
- Immediately unloaded impact
- Maintained cardio via cycling
- Introduced staged bone loading
- Gradually reintroduced running at week 5
They completed a 10km event pain-free 10 weeks later.
If they kept running another month → likely full fracture.
Why These Injuries Keep Coming Back
The real issue is rarely just the shin.
Common root causes:
- Weak calf endurance
- Poor shock absorption
- Sudden training spikes
- Low cadence running
- Hip control deficits
- Inadequate recovery
If you only rest — it returns.
How Physiotherapy Prevents Recurrence
Your rehab shouldn’t end when pain stops.
We build:
- Load tolerance
- Impact capacity
- Running efficiency
- Training planning skills
Most runners relapse because they never improved tissue capacity — only waited for pain to settle.
To learn more about this injury, CLICK HERE for our other blog on this topic.

The Return To Running Plan (Simplified)
Phase 1 — Calm Tissue
Bike / swim / gym only
Phase 2 — Load The Bone
Walking impact drills
Phase 3 — Reintroduce Running
Walk-run intervals
Phase 4 — Build Distance
Volume before speed
Phase 5 — Performance
Speed & hills
Skipping phases = relapse.
When To Seek Physio Immediately
Book ASAP if:
- Pain worsening week to week
- Pain in one exact spot
- Pain hopping
- Pain at rest
- Pain lasting >10 days
Early diagnosis shortens recovery massively.
FAQs
How do I know if I have shin splints or a stress fracture?
Shin splints usually feel like a broad ache that warms up with activity. Stress fractures feel sharp, localised and worsen during impact or hopping.
Can I run with shin splints?
Often yes — but load must be modified and rehab started early to prevent progression into a stress fracture.
Can shin splints turn into a stress fracture?
Yes. They’re part of the same overload spectrum. Ignoring shin splints is the most common cause of tibial stress fractures.
Do stress fractures always need a boot?
Not always. Early detection often avoids immobilisation and allows controlled loading rehab.
How long does recovery take?
Shin splints: 2–6 weeks
Stress fracture: 6–12+ weeks depending on severity
References
- https://www.sportsmedaustralia.com.au
- https://www.ais.gov.au/health-wellbeing/injury
- https://www.mayoclinic.org
- https://www.nhs.uk/conditions/stress-fractures/
- https://bjsm.bmj.com
Give us a call today on 9806 3077, or book online, just CLICK HERE with the hyperlink: https://x-physio.au4.cliniko.com/bookings#service
Golfers elbow vs Tennis elbow both cause annoying elbow pain — but they’re actually different injuries needing slightly different rehab. The good news? Physiotherapy works extremely well for both. In this guide you’ll learn how to tell them apart, what really fixes them, and how to stop them coming back. If your elbow’s been nagging — keep reading.
First — What’s the Difference?
Despite the sporting names, most people who get these injuries don’t even play golf or tennis.
They’re overuse tendon injuries caused by repetitive gripping, lifting, typing, tools, gym, or parenting.
| Condition | Location of Pain | Tendon Involved | Common In |
|---|---|---|---|
| Tennis Elbow (Lateral Epicondylitis) | Outside of elbow | Wrist extensors | Office workers, gym, racquet sports, tradies |
| Golfers Elbow (Medial Epicondylitis) | Inside of elbow | Wrist flexors | Manual labour, lifting, gripping, climbers |
So when people search “golfers elbow vs tennis elbow”, the key difference is simple:
👉 Outside pain = Tennis elbow
👉 Inside pain = Golfers elbow
But the treatment approach is similar — because both are tendon overload injuries (tendinopathy).

Why These Injuries Happen (The Real Cause)
It’s not inflammation anymore — research shows these are load tolerance problems.
Your tendon becomes weaker than the demand placed on it.
This happens when:
- You suddenly increase activity (gym, golf, DIY projects)
- Long hours gripping (mouse, tools, steering wheel)
- Poor technique
- Weak forearm or shoulder muscles
- Returning to sport too fast
- Poor recovery
The tendon starts degenerating rather than healing.
That’s why rest alone doesn’t fix it.

Symptoms: How to Tell Which One You Have
Tennis Elbow Symptoms
- Pain outside elbow
- Pain lifting kettle or coffee cup
- Weak grip strength
- Pain shaking hands
- Clicking mouse hurts
- Pain with wrist extension
Golfers Elbow Symptoms
- Pain inside elbow
- Pain gripping or squeezing
- Pain lifting weights palm-up
- Forearm tightness
- Tender to touch inside elbow
- Sometimes tingling in ring/little finger
- To learn more about Golfers Elbow – CLICK HERE and read out blog on it
Why It Doesn’t Heal By Itself
Many patients tell us:
“I rested it for months and it came straight back”
Because tendons don’t need rest.
They need progressive loading.
Without the right load:
- Tendon fibres become disorganised
- Pain sensitivity increases
- Strength decreases
- It keeps recurring
Physiotherapy fixes this by rebuilding tendon capacity.
Physiotherapy Assessment (What We Look For)
At XPhysio Frenchs Forest, we don’t just poke the elbow.
We assess the whole chain:
- Shoulder strength
- Grip strength
- Wrist mobility
- Neck contribution
- Technique (sport/work)
- Load capacity vs demand
Because elbow pain is usually the symptom — not the cause.
Physiotherapy Treatment for Tennis Elbow
1. Pain Reduction Phase
Goal: Calm the tendon without resting it
We use:
- Isometric loading exercises
- Activity modification
- Manual therapy
- Taping support
- Education (this matters most)
You can still use the arm — just in a smarter way.
2. Tendon Strength Phase
This is the most important stage.
We progressively load the tendon:
- Eccentric wrist extension
- Slow heavy resistance training
- Grip strengthening
- Forearm endurance
This actually stimulates tendon healing.
3. Return to Function Phase
Now we retrain real life tasks:
- Lifting mechanics
- Sport technique
- Work tolerance
- Power and speed
Most people skip this — and relapse.

Physiotherapy Treatment for Golfers Elbow Vs Tennis Elbow
Treatment is similar but targets different muscles.
Phase 1 — Calm Pain
- Isometric wrist flexion holds
- Reduce aggressive gripping
- Nerve irritation management (if present)
Phase 2 — Load the Tendon
- Eccentric wrist flexion
- Pronation strengthening
- Grip endurance training
- Shoulder stability work
Phase 3 — Functional Strength
- Pulling exercises
- Carrying tolerance
- Sport-specific drills
Golfer’s elbow often takes slightly longer due to poorer blood supply.
Important: Why Massage & Dry Needling Alone Won’t Fix It
They help pain short-term — but they don’t rebuild tendon strength.
Without loading:
Pain relief = temporary
With loading:
Tissue capacity increases = long term fix
Physiotherapy focuses on the long game.
Real Patient Example (Frenchs Forest Clinic)
We recently saw a 42-year-old dad from Belrose NSW who drove over to our Frenchs Forest clinic.
He developed severe inside elbow pain after:
- Starting gym pull-ups
- Weekend yard work
- Carrying kids
He’d rested it for 4 months — no improvement.
Findings:
- Weak shoulder stability
- Grip endurance poor
- Medial tendon overload (golfer’s elbow)
Treatment plan:
- Isometric holds (week 1)
- Progressive loading (weeks 2–6)
- Gym return plan (weeks 6–10)
Result:
✔ Pain reduced within 2 weeks
✔ Back to gym in 6 weeks
✔ Full pull-ups pain-free in 10 weeks
He said:
“I thought I’d need injections — turns out I just needed the right rehab.”
Do You Need Scans or Injections?
Usually no.
Research shows:
- Ultrasound findings don’t match pain well
- Cortisone helps short term but worse long term
- Exercise rehab outperforms passive treatment
Scans are only needed if:
- Severe trauma
- Locking
- Numbness spreading
- No improvement after rehab
How Long Does Recovery Take?
| Severity | Typical Recovery |
|---|---|
| Mild | 4–6 weeks |
| Moderate | 6–12 weeks |
| Chronic | 3–6 months |
If you’ve had pain >3 months — it’s a tendon conditioning issue.
Prevention Tips (Massively Important)
For Desk Workers
- Raise keyboard height
- Relax mouse grip
- Micro-breaks every 30 minutes
- Strengthen forearms weekly
For Gym
- Don’t over-grip everything
- Progress loads gradually
- Train shoulders not just arms
For Parents
- Carry kids close to body
- Alternate arms
- Avoid prolonged one-hand holding
The Big Takeaway
Both injuries are not inflammatory problems.
They’re:
Load management + strength capacity problems
The fix is progressive rehab — not rest, braces, or injections alone.
FAQs
1. Which is worse — golfers elbow Vs tennis elbow?
Neither is worse, but golfer’s elbow often takes longer to settle due to poorer tendon blood supply.
2. Should I stop gym if I have elbow pain?
No — you should modify it. Complete rest delays healing.
3. Do braces help?
They can reduce pain short term but don’t fix the tendon.
4. Can physio cure chronic elbow pain?
Yes — even long-term cases improve with progressive loading rehab.
5. How do I know if it’s nerve pain instead?
Tingling or numbness into fingers suggests nerve involvement — physio can assess this.
6. Will cortisone injections fix it?
They reduce pain short term but increase recurrence rates long term.
7. Is stretching helpful?
Only mildly. Strengthening matters far more.
8. When should I see a physio?
If pain lasts longer than 2–3 weeks or keeps coming back.
References
- https://www.physio-pedia.com/Lateral_Epicondylitis
- https://www.physio-pedia.com/Medial_Epicondylitis
- https://bjsm.bmj.com/content/50/19/1187
- https://www.jospt.org/doi/10.2519/jospt.2017.7337
- https://www.ncbi.nlm.nih.gov/pmc/articles/PMC3445129/
Give us a call today on 9806 3077, or book online, just CLICK HERE
https://x-physio.au4.cliniko.com/bookings#service
Thoracic Outlet Syndrome (TOS) is a sneaky cause of shoulder, arm and nerve pain that’s often misdiagnosed or overlooked. The good news? Thoracic outlet syndrome physiotherapy can significantly reduce symptoms by addressing posture, muscle imbalance and nerve compression — without injections or surgery. Let’s break it down.
Why This Shoulder–Arm Pain Might Not Be “Just a Shoulder Problem”
If you’ve got pain, pins and needles, heaviness or weakness running from your neck into your shoulder, arm or hand — and scans keep coming back “normal” — Thoracic Outlet Syndrome could be the missing piece.
TOS happens when nerves or blood vessels are compressed as they pass from the neck to the arm through a narrow space called the thoracic outlet. This compression can irritate sensitive structures, leading to pain that feels confusing, frustrating and persistent.
Many people end up treating the shoulder, elbow or wrist in isolation — without fixing the real cause.
That’s where physiotherapy comes in.

What Is Thoracic Outlet Syndrome?
Thoracic Outlet Syndrome refers to a group of conditions caused by compression of structures passing between the neck and shoulder, including:
- The brachial plexus nerves
- The subclavian artery
- The subclavian vein
This compression usually occurs between the:
- Collarbone (clavicle)
- First rib
- Surrounding muscles (scalenes, pec minor)
When space becomes restricted, symptoms show up fast — especially with poor posture, repetitive work, or overhead activity.

Types of Thoracic Outlet Syndrome
1. Neurogenic TOS (Most Common)
Accounts for around 90% of cases.
Symptoms include:
- Pins and needles in the arm or hand
- Neck and shoulder pain
- Weak grip strength
- Arm fatigue with overhead tasks
2. Venous TOS
Less common but more serious.
Symptoms include:
- Arm swelling
- Heaviness
- Bluish colour changes
3. Arterial TOS
Rare, but significant.
Symptoms include:
- Cold sensitivity
- Arm pain with activity
- Reduced pulse
👉 Physiotherapy is most effective for neurogenic TOS, which is what we see most often in clinic.

Common Causes of Thoracic Outlet Syndrome
TOS doesn’t usually come from one single event. It’s often a slow build-up from daily habits.
Common contributors include:
- Slouched or forward head posture
- Desk work and laptop use
- Repetitive overhead activity
- Heavy backpacks or tool belts
- Poor shoulder blade control
- Previous neck or shoulder injury
- Tight chest or neck muscles
Sound familiar? You’re not alone.

How Thoracic Outlet Syndrome Is Diagnosed
There’s no single scan that “proves” TOS. Diagnosis is mainly clinical, which is where experienced physiotherapy assessment matters.
At our Frenchs Forest clinic, assessment includes:
- Detailed symptom history
- Postural analysis
- Neck, shoulder and thoracic spine movement testing
- Neural tension tests
- Strength and motor control screening
- Functional aggravating positions
This allows us to identify where compression is happening and why.
If your symptoms are different, here is another related blog to read.
How Physiotherapy Helps Thoracic Outlet Syndrome
The goal of thoracic outlet syndrome physiotherapy is simple:
👉 Create more space for nerves and blood vessels by restoring normal movement and posture.
But how we do that is very individual.
1. Postural Re-education (The Game-Changer)
Poor posture is one of the biggest drivers of TOS.
Physiotherapy focuses on:
- Reducing forward head posture
- Improving thoracic spine extension
- Restoring shoulder blade positioning
- Teaching sustainable desk and work posture
Small changes here = big symptom relief.

2. Manual Therapy to Reduce Compression
Hands-on treatment can help reduce tension in structures that narrow the thoracic outlet.
This may include:
- Soft tissue release to scalenes and pec minor
- Thoracic spine mobilisation
- Rib mobility techniques
- Gentle neural glides
This isn’t about cracking — it’s about restoring movement.
3. Strengthening What’s Weak (Not Just Stretching)
Stretching alone isn’t enough.
We target:
- Deep neck flexors
- Lower trapezius
- Serratus anterior
- Rotator cuff stabilisers
These muscles keep your shoulder girdle in the right position during daily tasks.
4. Nerve Mobility (Without Irritation)
When nerves are irritated, they hate being yanked.
Physio-guided nerve mobility exercises:
- Improve nerve tolerance
- Reduce symptoms without flare-ups
- Restore confidence in movement
Done correctly, this is a huge win for people with nerve symptoms.
5. Education & Load Management
We also help you:
- Modify aggravating activities
- Adjust gym or work routines
- Pace recovery safely
- Understand flare-ups (so they don’t freak you out)
Knowledge reduces fear — and fear worsens pain.
A Real Patient Story from Our Frenchs Forest Clinic
Recently, we treated a patient who travelled to our Frenchs Forest NSW clinic from Dee Why, after months of unresolved shoulder and arm pain.
They had:
- Pins and needles into the hand
- Shoulder fatigue when driving
- Neck tightness
- Normal MRI results
They’d tried massage and rest, but symptoms kept returning.
After assessment, we identified neurogenic Thoracic Outlet Syndrome, driven by poor thoracic posture, tight pec minor muscles and weak scapular stabilisers.
Their Treatment Plan Included:
- Manual therapy to neck, ribs and chest
- Thoracic spine mobility work
- Postural correction strategies
- Progressive strengthening
- Nerve mobility exercises
The Result:
Within 6 weeks, their arm symptoms reduced significantly. By 10 weeks, they were driving, working and exercising without flare-ups — and finally understood why the pain was happening.
That’s the power of targeted physiotherapy.
How Long Does Recovery Take?
This varies, but most people see improvement within:
- 3–6 weeks: reduced symptoms and flare-ups
- 6–12 weeks: improved strength, posture and confidence
- 12+ weeks: long-term resolution and prevention
Consistency beats intensity every time.
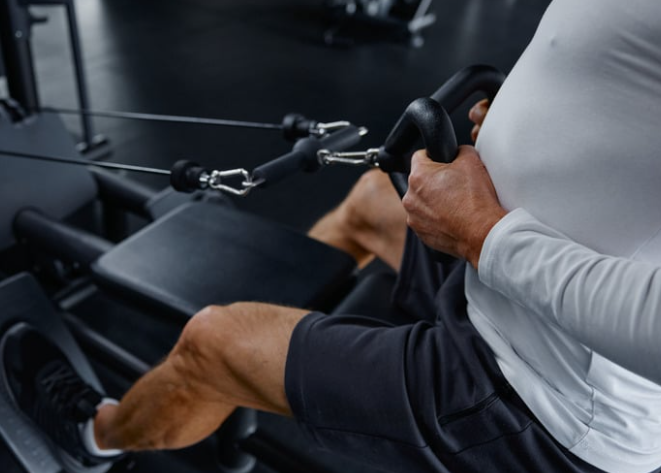
Can Thoracic Outlet Syndrome Come Back?
Yes — if the underlying drivers aren’t addressed.
That’s why physiotherapy focuses on:
- Long-term posture
- Strength habits
- Movement awareness
- Sustainable exercise routines
Our goal isn’t short-term relief. It’s lasting change.
When to Seek Help
You should consider physiotherapy if you have:
- Ongoing shoulder and arm pain
- Pins and needles without clear cause
- Symptoms worse with posture or overhead work
- Normal scans but ongoing pain
- Failed rest or massage alone
Early treatment = faster recovery.
FAQs – Thoracic Outlet Syndrome Physiotherapy
Is physiotherapy effective for thoracic outlet syndrome?
Yes. Physiotherapy is one of the most effective treatments for neurogenic thoracic outlet syndrome, helping reduce nerve compression, improve posture and restore normal movement without surgery.
How many physio sessions do I need for TOS?
Most people need between 6–12 sessions, depending on symptom severity, posture habits and how long symptoms have been present.
Can thoracic outlet syndrome heal without surgery?
In many cases, yes. Most neurogenic TOS cases respond very well to physiotherapy and exercise-based treatment.
What makes thoracic outlet syndrome worse?
Poor posture, prolonged desk work, overhead activity, stress and weak shoulder stabilisers commonly worsen symptoms.
Do I need imaging for thoracic outlet syndrome?
Imaging is often normal in TOS. Diagnosis is usually based on clinical assessment rather than scans.
References
- https://www.physio-pedia.com/Thoracic_Outlet_Syndrome
- https://www.ncbi.nlm.nih.gov/books/NBK557450/
- https://www.healthdirect.gov.au/thoracic-outlet-syndrome
- https://www.xphysio.com.au/blog/neck-pain-causes-treatment
- https://www.xphysio.com.au/blog/shoulder-pain-physio
Ready to Fix This Properly?
Give us a call today on 9806 3077, or book online, just CLICK HERE